Amazon is increasingly turning its focus towards brands, and with this newfound focus comes a range of great opportunities for those same outlets to increase their visibility and generate more sales.
One of the most popular and effective tools for achieving this goal is to set up an Amazon Store, and in this blog we’ll help you understand what this means and how to get your own Amazon Storefront started!
Then all you need is a good business strategy, read this on ClearAds for guidance.
Table of Contents
What is an Amazon Store?
In essence, an Amazon Store is a mini-website which showcases a particular brand on Amazon Marketplace. The storefront includes multiple pages where you can place links and relevant content, as well as accessing features designed to help boost your presence on the platform.
There are many benefits to opening an Amazon Store, though the most prominent amongst these include:
- Greater visibility – a store helps give customers a central space to return to when they are seeking your branded items, helping them find your products with ease.
- An online showcase – opening an Amazon Store helps give you the chance to show your brand in its best light, which is always welcome in the crowded digital marketplace.
- Educating your customers – This is a great place to educate your customers about your brand and tell them your story.
If you’re eager to open your own Amazon Store, here’s how to get started!
1. Open a professional seller account

Just as Amazon shifts towards increased interest in brands, it is also becoming an increasingly selective platform when it approves sellers on the Amazon Marketplace. New security restrictions call for added documentation and verification before being accepted as a member. While this might seem frustrating, it serves a real purpose by helping to protect sellers (and their brands) and allows the company time to counteract sellers who try and manipulate their own rankings, open multiple accounts, or sell counterfeit goods.
When you’re setting up your account, you’ll be asked for a few pieces of information:
- Account name – this is the company you want to use for your Amazon Seller account. In addition, you’ll be required to provide the full address, contact e-mail and phone number of the business, as well as key details such as the company structure, where it is registered, and tax information as you would add to a tax return.
- Verification details – this information is used to verify the identity of the account holder or company and includes adding any applicable ID as well as its country of issue, your date of birth and high quality images of the identification you are using to register your account.
- Payment information – here you will need to register a credit or debit card, from which Amazon will deduct your monthly account charge, and also add account details for depositing your profits from the Amazon Seller account every fortnight.
2. Apply to the Amazon Brand Registry
Amazon has been taking infringements against brands extremely seriously over the last few years, including creating the Amazon Brand Registry, which is designed specifically to address this issue.
Joining the Brand Registry will not only ensure you have access to a suite of tools which help you to protect your brand, but it will also give you crucial peace of mind when selling products on the platform. After registering, you can use these enhanced marketing tools and professional features to further enhance your performance on Amazon and help them to remove sellers who are infringing your trademark. Many users also make the most of Brand Analytics, which gives you ample data on your customers.
The most critical part of joining the Brand Registry however is that this then enables you to start developing your own storefront and give shoppers a real taster of your brand before they buy.
Applying for the Brand Registry requires you to submit details of your trademark, and there are some geographical restrictions to this business aspect of the process. You will also need to submit a list of the countries where you distribute and manufacture your products, as well as images of the brand name and products you will be selling. Read more about the process on Repricer Express.
Once you have completed the application, Amazon will assess the information you have provided and if successful, you will be sent a verification code. After sending it back to Amazon, you’ll become an officially registered member of the Amazon Brand Registry.
3. Optimize your product pages
This is an important step to ensuring your success on Amazon, and will also help boost the overall look and feel of your Amazon Store. Ensuring you have optimized product pages is important not only for you to appeal to Amazon’s algorithm, but to ensure that customers have all the information they need to make a purchase decision.

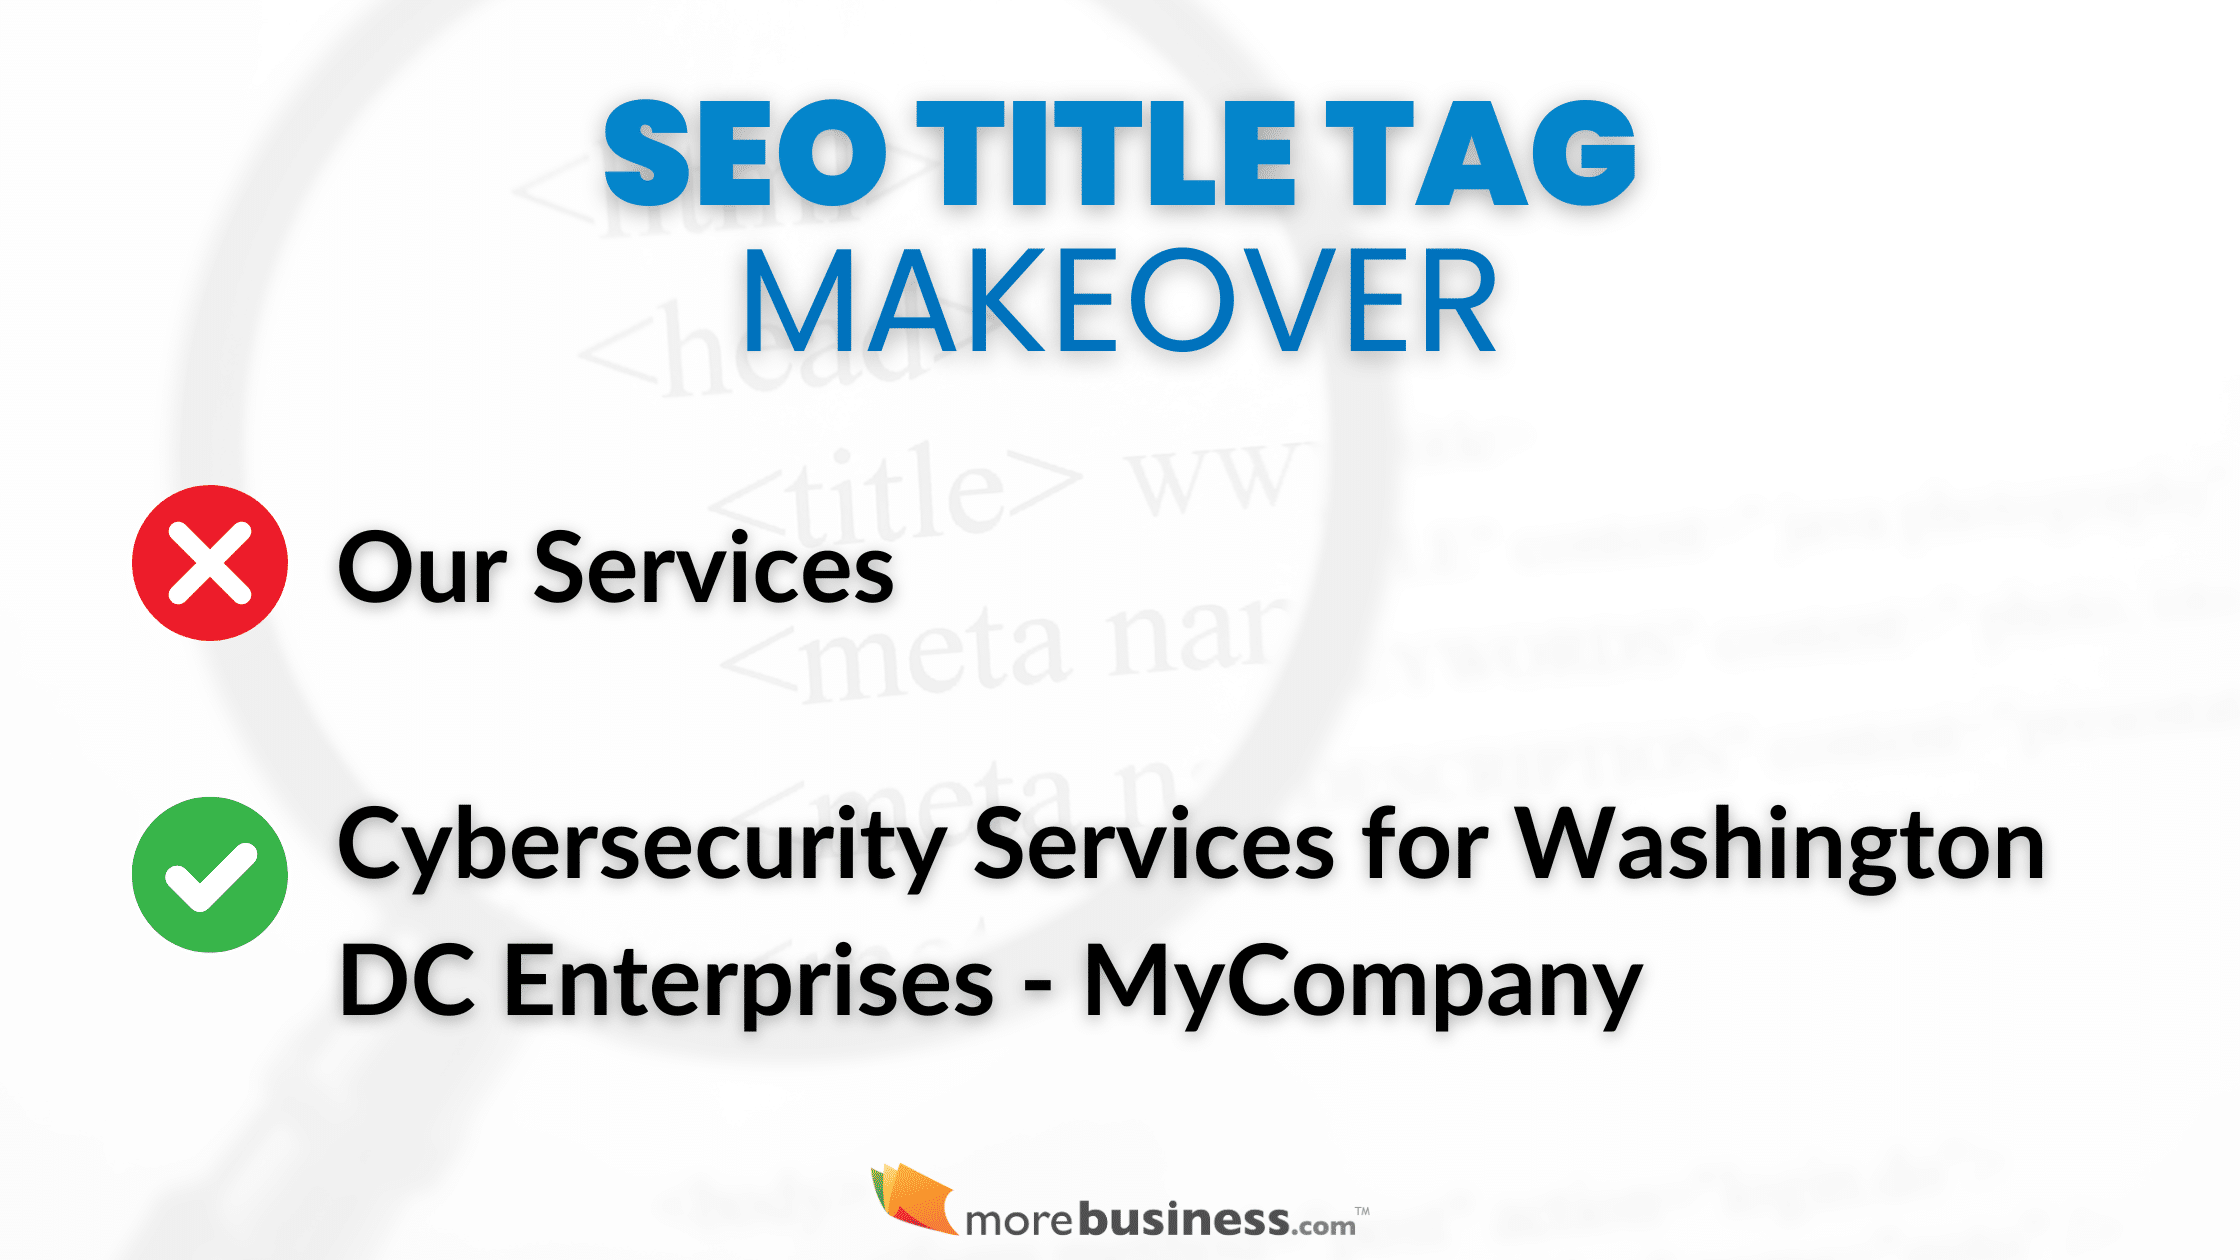
Creating a fantastic product page should include some research into what your competitors are doing, as well as checking your keywords are effective enough to appeal to your target audience. The best product pages start with the title, which should make use of your most important (high value) keywords. Be sure you don’t sacrifice readability at this stage, however, as this can be off-putting to customers, and could even see you ranked lower by the algorithm.
When composing the bullet points for your product listing, focus on the benefits of your product – and don’t shy away from explaining the emotional rewards where possible. Again, use your keywords with care.
Lastly, ensure each product listing includes high quality images. If you aren’t skilled with a camera, then outsource this task to make sure that everything from the lighting to the clarity are carried out in accordance with both Amazon’s rules and good practice for any online shopping portal. Amazon also allows you to exchange one of your photos for a video, so if you have promotional clips, this would be a fantastic way to use one of them.
4. Create your branded storefront
This part of the process is arguably the most fun for brands, as it gives you the chance to get creative whilst simultaneously showcasing everything great about your products! Acting as a mini website, you should view creating the Amazon Store as similar to developing any other ecommerce website.
Decide how many pages you want to include in your Amazon Store. Many brands choose to create their pages focusing around individual product categories, which makes it easy for users to navigate. Be sure the look and feel of your website supports the marketing messaging which can be found in the rest of your brand literature and advertising, to keep everything cohesive.
Every page is given its own header image, where you can place more text and images. There are other ways to make sure your storefront stands out for the right reasons. Using video is a popular option, as it gives you the chance to tell the story behind the brand, and connect with customers on a more emotionally-focused level. However, be sure to keep video clips relevant and short – few buyers will want to stay watching a clip beyond around 30 seconds.
To set up your store homepage, navigate to Manage Stores in Seller Central, where you will have access to the brands which you monitor. Select the right one (if managing multiple accounts) and follow the instructions.
Choosing a template
Selecting your store template presents you with four distinct themes, so simply choose the one you feel will most reflect your brand and products. There is also the option to begin from scratch and design your own template, though this is traditionally only reserved for experienced sellers.
Adding new pages
Building the rest of your storefront will require you to add extra pages, as decided earlier in the process. Ensure the structure remains easy to navigate, and that customers can easily find all they need to without too much fuss or hassle.
Adding content titles
When you have organized the hierarchy of pages in your navigation, then you can begin adding content titles to every individual page. As with many aspects of the Amazon Store process, this allows you to add some personality and added information which will be of value to the customer, via images, video, products which are best sellers, and other elements which you think will appeal to your target audience.
Submit for review
When you’ve completed your pages, submit them to be reviewed by Amazon. Be sure to check for any grammatical or factual errors in the text and be sure you have used consistent branding across all your pages. This will allow users to undergo a consistent customer journey and makes them more likely to shop with you.
Are there any hidden costs?
If you have already registered as a seller on Amazon, then there are no additional costs to opening an Amazon Store – yet the rewards, both in your brand reputation and financially, can be tremendous.