Podcast editing to create production-ready content can be time-consuming. I’ve found a very fast way to do podcast editing using Riverside.fm and Descript. The following 8-step process can help you complete all of your post-production tasks within 10 minutes rather than taking hours of editing with Riverside FM and Descript. I’ve refined this process based on the current feature sets of both tools.
Although both products have started to create overlapping features, I found that using Riverside.fm for recording and Descript for post-production podcast editing makes life a lot easier. The step-by-step instructions I provide below were refined over quite a tries to get it down to under 10 minutes of work.
Table of Contents
Post-Production Podcast Editing with Riverside.fm and Descript
Follow this step-by-step approach in order and you should be able to create your production-ready podcasts very quickly, usually within 10 minutes once you’ve created the templates in Step 1. This podcast editing process is exactly how I create my podcasts at MoreBusiness.com.
Check Out: MoreBusiness.com Podcast →

Tools Used (affiliate links):

Riverside.fm (podcast recording)
Descript (video editing)
Canva (create outro)
Step 1: Create These 3 Templates in Descript
 Descript has the capability to create templates that you can use repeatedly for all of your podcasts. This podcast editing step will take you the longest time compared to any of the other steps. Fortunately, you only have to do it once and then you will be able to use your templates repeatedly. Think of this step as picking your pots and pans before you cook a meal.
As a side note, I create these templates in 16:9 format for standard landscape layout. I then duplicate these templates and reformat for both 9:16 and 1:1 for social posts. This allows me to clip a segment from Descript, quickly apply a template, then publish the post.
Before you get started on any post-production activities, use Descript’s video editor to create these three templates.
1. Logo and Captions Overlay
Grab your logo file, one with a transparent background would be ideal. If you don’t have a logo with a transparent background, you can add a box or a circle to your template as the backdrop for your logo and place the logo on top of it. I recommend positioning your logo in the top left or top right of your video podcast so that you can leave the bottom part of the screen for captions.
At the bottom of this template to automatically embed your captions. I usually go through my LinkedIn feed with audio turned off and it turns out many others do, too. Although many services like YouTube and LinkedIn can automatically create captions, I found that embedding captions on the video itself lets me reach audiences without requiring them to enable captions. That said, if you prefer to let Youtube or other hosting platform manage the captions for you, then skip that part of your template.
You will apply this template to your entire video, except to your outro if it already includes your logo built in.
2. “Autogenerated Captions” Note
Because automatically generated captions can contain errors, I like to include a small note in the opposite corner of the logo that displays for a few seconds after the podcasts introduction section. The message reads “Autogenerated Captions.” This way the audience knows that there may be typos. You can even include a short subtitle below this message such as “Typos Ahead”.
I don’t include this caption notice in the first template with the logo and captions overlay. By having this as a separate template, you can apply it to a small segment of your final video because your logo template will be applied to the entire production.
Again, if you aren’t including captions, then skip this template.
3. Outro With Visual Space for Next Video and Subscribe Notice
The final template you’ll need is an outro. You can find examples in Canva or other design tools that you can edit to customize with your branding. For mine, I have a picture of myself on the top left with my name and a note to subscribe below. I leave space on the right for YouTube to automatically insert an option to watch one of my other podcasts or playlists.
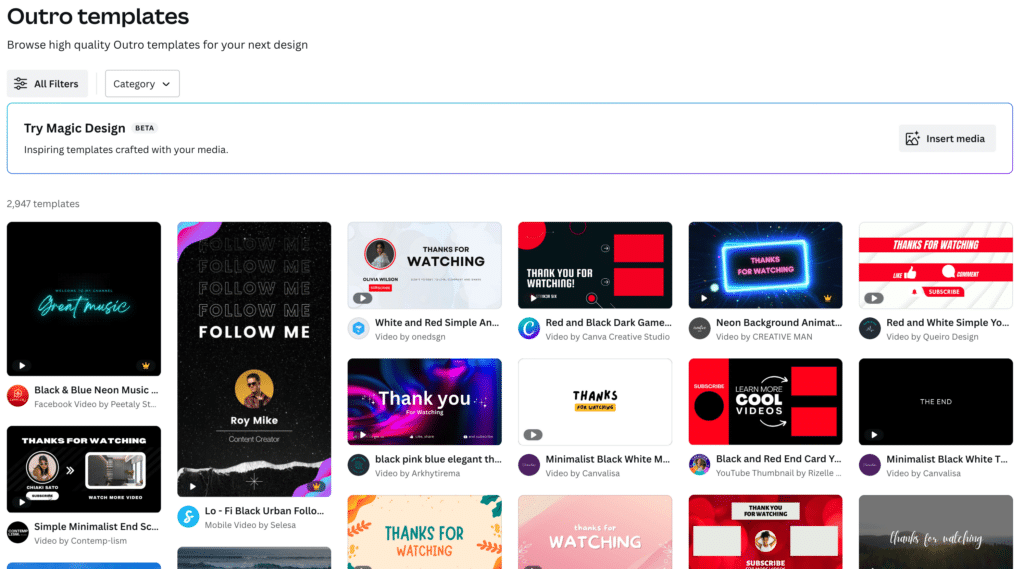
I recommend that your outro be at least 7 seconds long so that when the viewer sees your recommended next video, they see it inside your video without distractions before YouTube switches to its default end screen which will show videos that are not yours.
Quick note: although Riverside.fm claims to have podcast editing capabilities, including adding an intro/outro video, they are nowhere near as easy to use as Descript, which is why I feel paying the additional monthly fee for Descript is worth it.
Now You’re Ready
Once you have your templates ready, the remaining steps are very easy and take only about 5 to 10 minutes to complete. You’ll have a production-ready podcast that you can publish live or schedule.
Step 2: Download the “Full Frame AI” Export from Riverside.fm
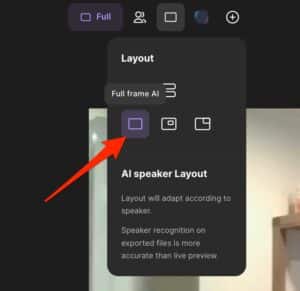 Riverside.fm has native integration with Descript. However, I’ve found that exporting the “Full Frame AI” version, which toggles between the person speaking, allows me to create production-ready videos much faster. Their native integration requires a lot more manual editing work for most podcasts, particularly if you intend to use your entire recording without clipping out lots of segments.

Go to your podcast recording, select “Full Frame AI” and then click export. I only select “Remove Watermark” in the export options, not the others to remove background noise or normalize audio. I find that Descript’s Studio Audio feature works better to fix the sound.
Once your file is ready, download it for the next step.
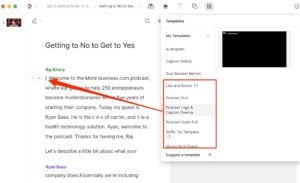
Step 3: Create a New Project in Descript
You’re now ready to get your video recording into Descript to make your final edits.
Select New Project and then upload your video file from Step 2 and identify the speakers when Descript prompts you to do so.
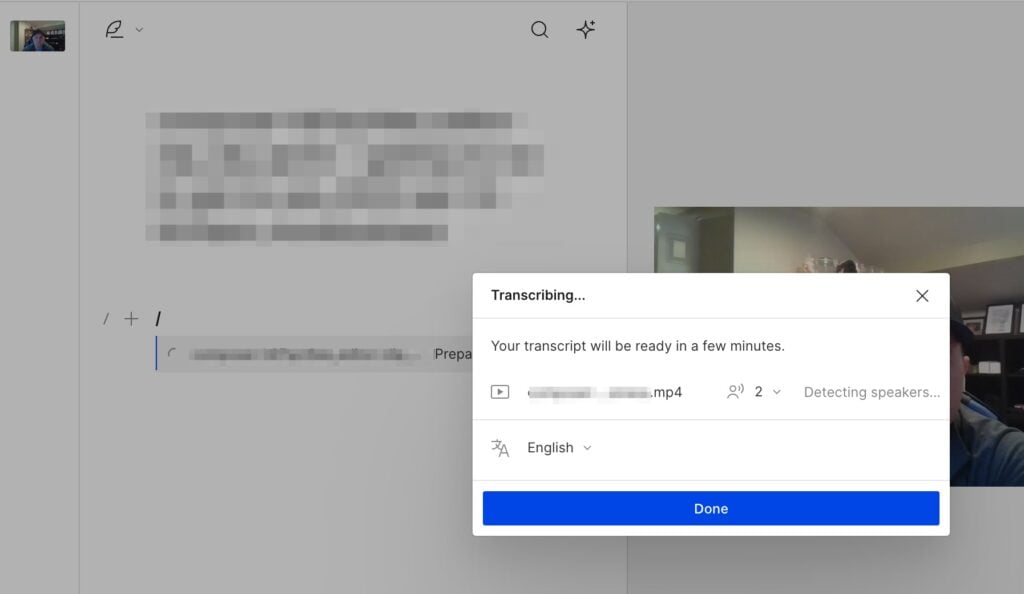
Do not have Descript autosplit the video based on who is talking. The Full Frame AI export from Riverside.fm automatically switches the display to show the person who is talking so you don’t need to worry about fixing errors if Descript doesn’t display it properly.
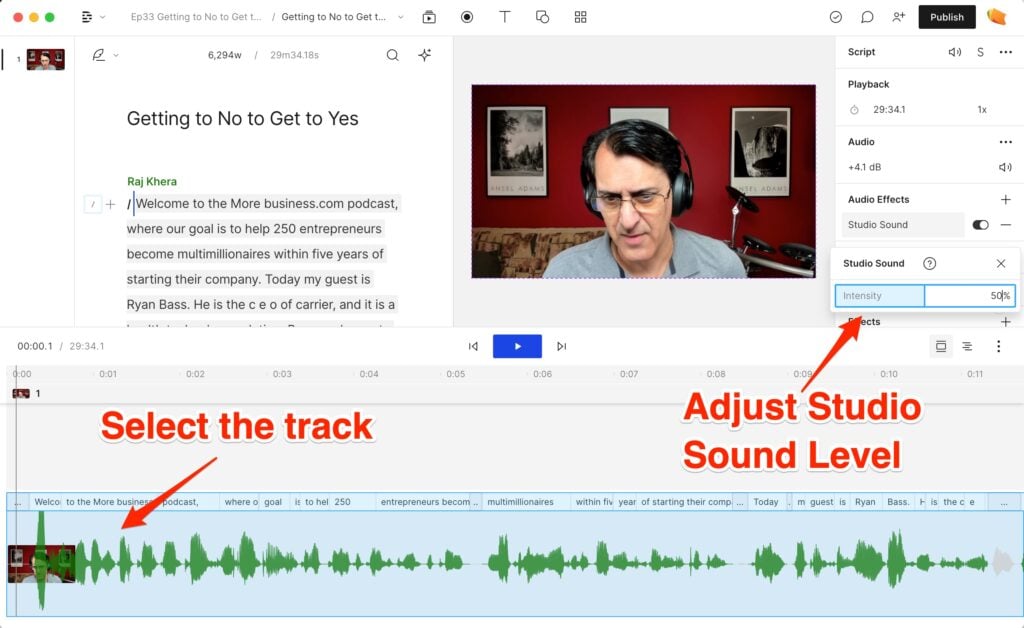
Step 4: Adjust the Sound Using Descript’s Studio Audio
I’ve got a quiet room for podcast recording, a Blue Yeti mic, and a Beats Studio headset, yet I find that using Descript’s Studio Audio option cleans up the sound quality in a way that makes the audio feel rich. Depending on how much external noise is in your audio track, you might want to adjust the Studio Audio percentage up or down. For my recordings, setting it to 50% gives my soundtrack the clean feel I like.
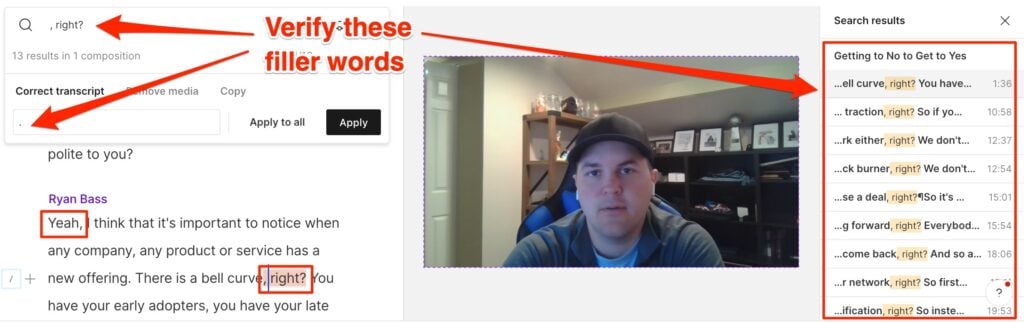
Step 5: Remove Filler Words
No matter how hard I try, my natural tendency is to say “uh” and “ah” while some of my podcast guests say “um” a lot without realizing it. This is a very common podcast edit that most podcasters encounter.
Descript’s filler word removal tool comes in handy to get rid of these filler words quickly, but I prefer to remove them only in the transcript and not the actual audio track. Keeping these filler words in the audio makes the podcast feel more natural. Here’s how you make this happen in Descript:
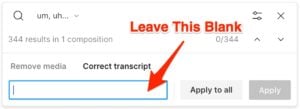
Select the option to Remove Filler Words, but then select Correct and don’t put anything in the box. This way, Descript will remove the words in the captions and leave your original audio track alone.
The common filler words I remove are:
- Uh, um, ah
There’s more to filler word removal. Sometimes, you’ll hear “right?” or “like” and maybe “so” but not every instance needs to be changed. Here’s a podcast editing hack I use to remove the words that are truly fillers. I search for these terms but then look at or listen to the clip to make sure it should actually be removed. If it works as a smooth part of the conversation, then I leave it alone. The three most common additional filler words I’ve found are:
- ,right?
- yeah,
- yeah.
- so [space character]
- like
Step 6: Fix Typos
Descript’s transcription is not a good as some other video editing tools, like Kapwing. That means you’ll need to manually edit some common transcription errors so your captions look professional. Here is the list that I use with Descript’s find and replace feature:
- outta → out of
- gonna → going to
- wanna → want to
- gotta → got to
- ‘em → them
- cuz → because
I also hunt for random spellings of my name, Raj, which Descript transcribes in all sorts of ways depending on the intonations that my guest used during the podcast interview (Rod, Roger, you name it I’ve seen it). It will occasionally get it right, but it gets my last name, Khera, wrong every time.
Step 7: Shorten Word Gaps
Allowing long pauses within your final podcast production is a personal preference. I like to keep mine more upbeat with quicker-paced dialog so I trim the gaps to be no more than 0.5 seconds long. Descript’s feature enables this podcast editing step to go pretty quickly, saving you hours of time manually splicing the gaps in the actual audio track.
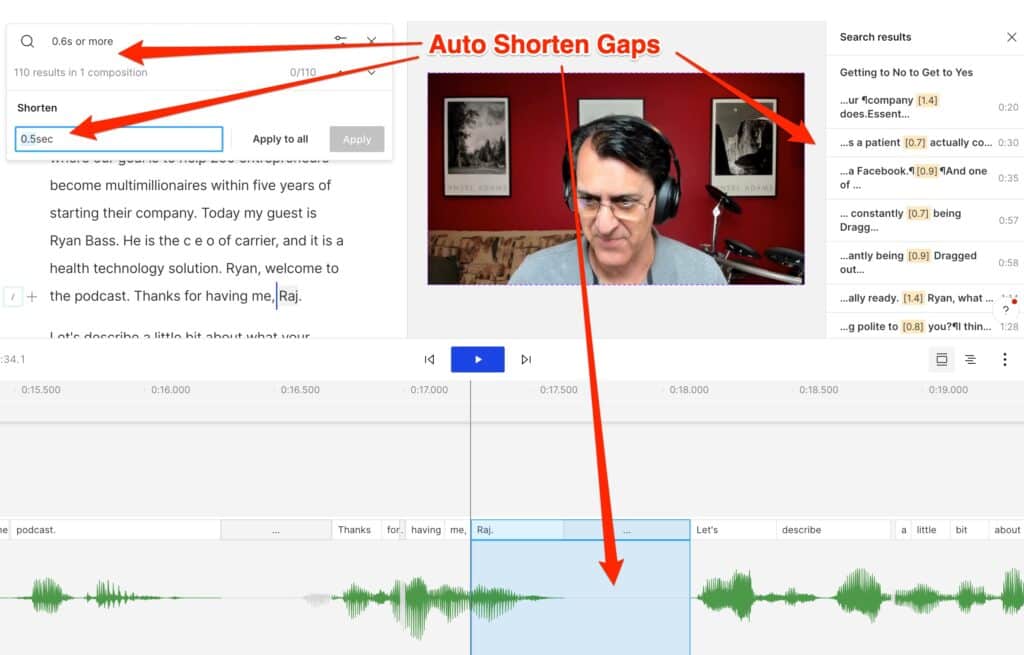
I tried making them 0.2 seconds but that results in many words being cut off during the conversation, creating an unwanted choppy effect.
By the way, just trimming the gaps often reduces my 30 minute podcasts by a couple of minutes to 27 or 28 minutes.
Step 8: Fix Punctuation Errors
Your next step is to get rid of punctuation issues, including duplications. This is done using the find/replace just as you did in Step 6 to fix the typos.
The reason I don’t do it during podcast editing Step 6 is that I’ve found additional punctuation errors somehow appear after shortening the word gaps. While this makes no sense technologically, I’ve seen this happen enough times that I put this fix into its own separate step after shortening the word gaps.
Do a Find on these instances and replace them with the proper punctuation or with nothing so they are removed:
- . . (period space period)
- . , (period space comma)
- , . (comma space period)
- , , (comma space comma)
Step 9: Add Your Templates
Let’s get back to those templates you created in Step 1.
- Go to the beginning of your project and add template 1, your logo and captions. Click your logo and drag it across your entire project timeline. Do the same for the captions.
- Shortly after your opening words, add template 2, your caption notice. Use Descript’s segment creation method (adding a “/” character to start/end a segment) to select the portion of the video to include the caption notice.
- Go to the end of your podcast text and enter “/” to create a new segment after the ending. Add template 3, your outro.
Step 10: Export and Publish
Voila, you’re done! Your full podcast from Riverside.fm and Descript is production-ready. After Step 1 (which you only need to do once), you should be able to go through all of the remaining steps within 10 minutes to create your final podcasts.
Select Publish and go to the Export option to download your finished video podcast. You’ll get a file that’s ready to upload to your podcast hosting platform.
 Step 11 (Optional): Create Social Media Clips
To get more mileage from your podcast editing efforts, you might want to find soundbites that make for good listening on social media. Simply find the clips you like, highlight them, and select New Composition.
Descript will add these clips to your project for editing. You can update the dimensions for TikTok, Youtube Shorts, or LinkedIn. That’s where creating multiple templates that have different dimensions comes in handy and reduces your editing time.
Clips under one-minute duration are automatically pushed out by Youtube as Youtube Shorts, which gives you more exposure quickly.
Clips with stories and emotions tend to get more traction on all social platforms. It goes to the heart of my favorite theme that I used to grow my companies over the years:
Facts tell. Stories sell.
The more stories you can create from your podcast edits, the higher the likelihood that you’ll attract a wider audience.
Got Any New Hacks?
With new features being added all the time to both Riverside.fm and Descript, there will be new hacks that will make all of our podcast editing lives easier.
If you’ve discovered a hack that you would like to share, please let me know. Thanks for taking the time to read this article.
Please subscribe to my podcast here for tips to grow your small business:
MoreBusiness Podcast →
 Author: Raj Khera is an Executive Business Coach, a startup founder and former 3x CEO who sold his companies to public firms, and publisher of MoreBusiness.com where his goal is to help 250 entrepreneurs become multi-millionaires within 5 years